Xdebug 残心の章 – つまり補足
複数ディストロが起動中の場合
Windows側のブラウザから何気なくlocalhostでアクセスしてうまくデバッグできていれば気にしないかもしれないが、WSL上で複数のディストロを実行していると思ったように動作せずハマることもあるので以下を予備知識として知っておくとよい。
WSL2上のディストロが複数立ち上がっているときにWindows側のlocalhostにマッピングされているのはそれら複数のディストロのうち1つである。
例)
同じPCでUbuntu 20とUbuntu 18を立ち上げている状態で、それぞれのディストロのIPアドレスを見ると次のようになっている。
Ubuntu 18 : 192.168.1.101(ホストPCのIPと同一)
Ubuntu 20 : 172.30.118.182
Ubuntu 18
cuore@hide-dell:~$ ip addr 18: eth0: link/ether 8c:04:ba:a3:7c:39 inet 192.168.1.101/24 brd 192.168.1.255 scope global dynamic valid_lft 75218sec preferred_lft 75218sec inet6 240d:1a:ad2:f500:8144:791d:fe29:1e8/64 scope global dynamic valid_lft 10605sec preferred_lft 10605sec inet6 240d:1a:ad2:f500:9550:83ae:656c:4a94/128 scope global dynamic valid_lft 10605sec preferred_lft 10605sec inet6 fe80::8144:791d:fe29:1e8/64 scope link dynamic valid_lft forever preferred_lft forever <略> |
Ubuntu 20
cuore@hide-dell:~$ ip addr <略> 4: eth0: link/ether 00:15:5d:73:a0:07 brd ff:ff:ff:ff:ff:ff inet 172.30.118.182/20 brd 172.30.127.255 scope global eth0 valid_lft forever preferred_lft forever inet6 fe80::215:5dff:fe73:a007/64 scope link valid_lft forever preferred_lft forever <略> |
Ubuntu 18もUbuntu 20も両方Apache2が起動しており、80番ポートで待ち受けている。
そしてブラウザからlocalhostでアクセスするとUbuntu 20につながる。
このとき、Ubuntu 18につなぎたいときはIP指定で192.168.1.101にアクセスすればつながる。
そこでUbuntu 20を落としてみる。
ホストPCのPower Shellからwslコマンドで停止。
PS C:\Users\salpa> wsl -l -v NAME STATE VERSION * docker-desktop-data Running 2 Ubuntu Running 2 Ubuntu-18.04 Running 1 docker-desktop Running 2 PS C:\Users\salpa> wsl -t Ubuntu PS C:\Users\salpa> wsl -l -v NAME STATE VERSION * docker-desktop-data Running 2 Ubuntu Stopped 2 Ubuntu-18.04 Running 1 docker-desktop Running 2 |
そして先ほどと同様にホストPCからlocalhostにアクセスすると、今度はUbuntu 18につながるようになる。
ゆえに、WSL2上で複数ディストロを起動しているときはlocalhostでマッピングされている相手がどのディストロなのかを意識しておく必要がある。
Xdebug自動起動について
説明
この項ではphp.iniの自動起動が有効か無効かについて理解するための情報を示します。
Xdebugのバージョンごとの該当オプション
- Xdebug 2 : xdebug.remote_autostart
- Xdebug 3 : xdebug.start_with_request
- Xdebug 2 : xdebug.remote_autostart=1
- Xdebug 3 : xdebug.start_with_request=yes
本来Xdebugとのやり取りはブラウザからアクセスするURLに下記のパラメータを付けておく必要がある。
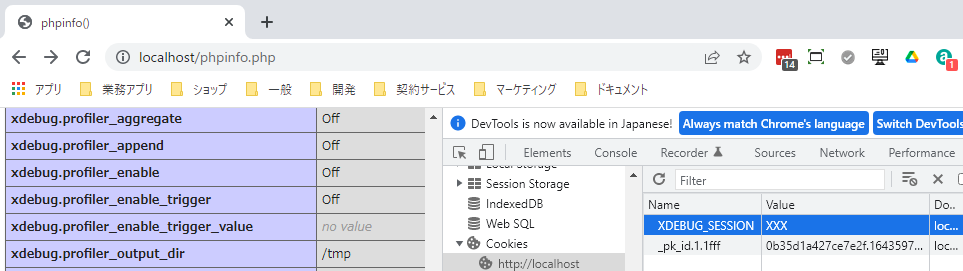
?XDEBUG_SESSION_START=XXX |
しかし自動起動が有効に設定されていると無条件にXdebugが動作する。
Xdebugによるテストを明示的に行いたいときはremote_autostart=0(Xdebug.start_with_request=no)としておくこと。特に他人が同じサーバーにアクセスする場合は注意する。自分のローカルPCでテストしているようなときはいちいちパラメータを指定しなくてよいので有効にしておくのが便利。
ただし、一度パラメータを指定してでアクセスするとクッキーに履歴が残り、クッキーが有効な間は自動的にこのパラメータがついてしまう。
Cookieの確認はChromeならF12 > Applicationタブ > Cookiesで確認できる
 |
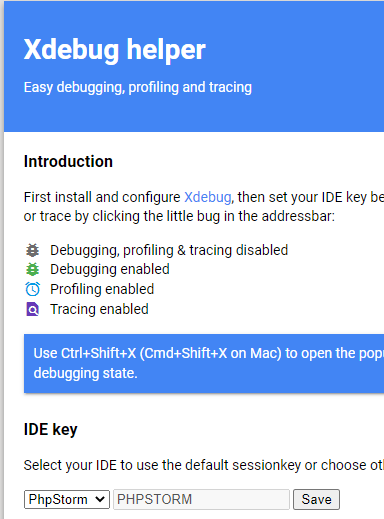
Chromeの拡張機能で「Xdebug helper」を使えばコントロールが容易。
 |
コンテナからDockerホストにつながらないとき
コンテナからphp.iniで定義してあるxdebug.client_hostのサーバー名(例えばhost.docker.internal)でつながらないときはホストのIPアドレスを調べるか、docker-compose.ymlにextra_hostsを設定するなりして接続できるようにしておくこと。
host.docker.internalにpingが通らない状態。
root@55409e1a090b:/var/www/html# ping host.docker.internal ping: host.docker.internal: Name or service not known |
PHPStormのバックエンドインストール失敗からのリカバリ
VPSにPHPStormのバックエンドをインストールしている途中で何度もエラーになった。その解決プロセス。
スタンドアロン版Gateway
PHPStormのプラグインではなくスタンドアロン版のJetBrains Gateway Setupからやってみる。
公式サイトからダウンロードして自分の開発PCにインストール。
コネクションする前に前回インストールの残骸があるのでリモートサーバで/root/.cache/JetBrainsフォルダを削除する。
やはり失敗!
 |
パッケージファイルは下記の様にダウンロード成功している。
~/.cache/JetBrains/RemoteDev/dist/37ad5a4ef5ae7_PhpStorm-2021.3.2.tar.gz
雰囲気的に、インストールは成功しているがその後の実行でエラーになっている気がする。
リモートで手動インストール
リモートにSSHターミナルで入って手動で起動(RUN)してみる。
root@160-251-49-56:~# ./.cache/JetBrains/RemoteDev/dist/284e5c84be2c3_ideaIU-2021.3.2/bin/remote-dev-server.sh run “/home/cuore/php_xdebug_app” IDE config directory: /root/.config/JetBrains/RemoteDev-IU/_home_cuore_php_xdebug_app IDE system directory: /root/.cache/JetBrains/RemoteDev-IU/_home_cuore_php_xdebug_app Opening the project with this launcher will trust it and execute build scripts in it. You can read more about this at https://www.jetbrains.com/help/idea/project-security.html This warning is only shown once per project Press ENTER to continue, or Ctrl-C to abort execution [DEBUG] :: IdeState :: Starting attempts to attach IJ injector agent [DEBUG] :: IdeState :: Starting attempts to initialize IDEA: fix AA and disable smooth scrolling (at start) [DEBUG] :: IdeState :: Starting attempts to Forbid platform updates and plugin update notifications [DEBUG] :: IdeState :: Starting attempts to Getting IDE colors [DEBUG] :: ProjectorServer :: Daemon thread starts [DEBUG] :: IdeState :: Starting attempts to search for editors 2022-02-02 11:09:22,724 [ 533] WARN – llij.ide.plugins.PluginManager – id redefinition ([row,col,system-id]: [2,3,”product classpath”]) Feb 02, 2022 11:09:27 AM java.util.prefs.FileSystemPreferences$6 run WARNING: Prefs file removed in background /root/.java/.userPrefs/prefs.xml 2022-02-02 11:09:30,775 [ 8584] WARN – Host.UnattendedHostStarterBase – Hostname is not provided, using: ‘160-251-49-56’. You can specify it manually with ‘–ssh-link-host’ option 2022-02-02 11:09:30,816 [ 8625] WARN – Host.UnattendedHostStarterBase – Username is not provided, using: ‘root’. You can specify it manually with ‘–ssh-link-user’ option 2022-02-02 11:09:30,817 [ 8626] WARN – Host.UnattendedHostStarterBase – Ssh port is not provided, using: ’22’. You can specify it manually with ‘–ssh-link-port’ option 2022-02-02 11:09:33,594 [ 11403] WARN – l.NotificationGroupManagerImpl – Notification group CodeWithMe is already registered (group=com.intellij.notification.NotificationGroup@1685cc28). Plugin descriptor: PluginDescriptor(name=Code With Me, id=com.jetbrains.codeWithMe, descriptorPath=plugin.xml, path=~/.cache/JetBrains/RemoteDev/dist/284e5c84be2c3_ideaIU-2021.3.2/plugins/cwm-plugin, version=213.6777.52, package=null, isBundled=true) 2022-02-02 11:09:35,390 [ 13199] WARN – #com.intellij.ui.jcef.JBCefApp – JCEF is manually disabled via ‘ide.browser.jcef.enabled=false’ Killed |
Killedの後、VPSがハングして再起動した模様。
どうもサーバーの負荷が怪しいのでConoHaのリソースモニターを見る。
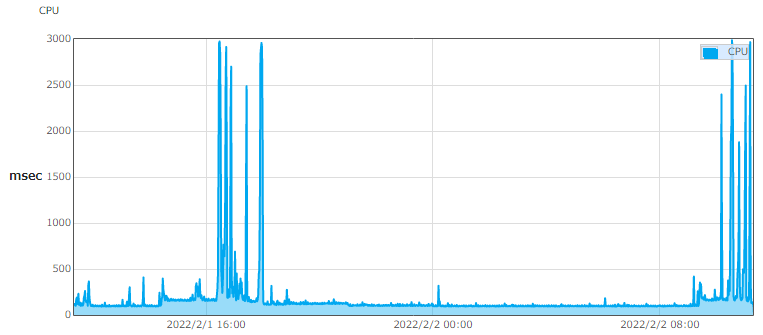 |
リブートしたわけではないので、VPSのマネージコントロールでプロセスがKillされたか。
root@160-251-49-56:~# last reboot reboot system boot 5.4.0-91-generic Thu Dec 16 12:53 still running |
VPS上ではコンテナが8個稼働していたので当面は不要な3つのコンテナを停止して再チャレンジしたら成功した。
わかったこと
- インストール失敗はアカウントの権限が足りないせいかと思ったが関係なかった。
- 失敗してカレントディレクトリに残骸が残っても、そのまま再チャレンジすればzipダウンロードから再試行してくれる。
- PHPStormのバックエンドを動かすにはそれなりのサーバー性能が要求される。今回のことで、ConoHa VPSのプランを1Gから2Gにスケールアップしたら、それまでレスポンスの悪かったIDEの操作も快適になった。